
category
TensorRT-LLM
https://github.com/NVIDIA/TensorRT-LLM
TensorRT-LLM为用户提供了一个易于使用的Python API,以定义大型语言模型(LLM)并构建包含最先进优化的TensorRT引擎,从而在NVIDIA GPU上高效地执行推理。TensorRTLLM还包含用于创建执行这些TensorRT引擎的Python和C++运行时的组件。
https://github.com/NVIDIA/TensorRT-LLM/tree/f430a4b447ef4cba22698902d43eae0debf08594/tensorrt_llm/models/qwen
https://github.com/NVIDIA/TensorRT-LLM/tree/f430a4b447ef4cba22698902d43eae0debf08594/examples/qwen
【LLMOps】Triton + TensorRT-LLM部署QWen
https://www.cnblogs.com/zhouwenyang/p/18023854
背景
TensorRT-LLM是Nvidia官方推出的大模型推理加速框架,目前只对部分显卡型号有做定制加速。最近新出的Chat with RTX也是基于TensorRT-LLM进行的本地推理。
TensorRT-LLM支持PagedAttention、FlashAttention、SafeTensor等手动,某些社区号称吞吐能力测试结果超过vLLM。
准备
- 显卡A800
- QWen7B 预训练模型
构建镜像最好自己构建最新的。尝试使用nvidia提供的镜像,发现镜像版本滞后。而且使用后出现各种不兼容,很容易让人误以为是自身操作问题。
开始
转换权重
首先需要将QWen模型转换为TensorRT所支持的.engine格式的权重文件
环境构建
下载TensorRT-LLM的官方代码:https://github.com/NVIDIA/TensorRT-LLM.git
然后编辑 TensorRT-LLM/docker/Dockerfile.multi ,内容如下
 View Code
主要是在59行加上一个pip镜像。
cd TensorRT-LLM/docker
make build
执行上述命令,构建镜像。以我这边为例,构建完的镜像名为 tensorrt-llm:v3
容器启动
docker run -it --gpus '"device=1"' --name trt-llm -v /home:/home tensorrt-llm:v3 bash
docker exec -it trt-llm bash
转换权重
进入到容器内部
cd examples/qwen
pip config set global.index-url https://pypi.tuna.tsinghua.edu.cn/simple
pip install -r requirements.txt
中间会报tensorrt版本冲突,忽略即可。
执行转换:
python3 build.py --hf_model_dir /home/Qwen-7b/ --dtype bfloat16 --paged_kv_cache --use_gpt_attention_plugin bfloat16 --enable_context_fmha --use_gemm_plugin bfloat16 --use_inflight_batching --remove_input_padding --enable_context_fmha --output /home/trt_engines_qwen7b_bf16
测试:
python3 ../run.py --input_text "请你讲述一个故事" --max_output_len=64 --tokenizer_dir /home/Qwen-7b/ --engine_dir=/home/trt_engines_qwen7b_bf16
测试结果如下:

/usr/local/lib/python3.10/dist-packages/tensorrt_llm/runtime/generation.py:881: UserWarning: The PyTorch API of nested tensors is in prototype stage and will change in the near future. (Triggered internally at /opt/pytorch/pytorch/aten/src/ATen/NestedTensorImpl.cpp:178.)
 torch.nested.nested_tensor(split_ids_list,
Input [Text 0]: "<|im_start|>system
You are a helpful assistant.<|im_end|>
<|im_start|>user
hello<|im_end|>
<|im_start|>assistant
"
Output [Text 0 Beam 0]: "Hello! How can I help you today? Is there something you would like to talk about or ask me a question? I'm here to assist you with any information or advice you might need."
推理
构建镜像
下载triton代码:https://github.com/triton-inference-server/tensorrtllm_backend
此处有坑,构建时忘记记录了,跳过。最终构建的镜像:triton-trt-llm:v3.0
启动服务
进入到目录下执行
将tensorrtllm_backend/all_models/inflight_batcher_llm 复制到/home/tensorrtllm_backend/model_repository下
python3 tools/fill_template.py -i /home/tensorrtllm_backend/model_repository/tensorrt_llm/config.pbtxt triton_max_batch_size:64,decoupled_mode:False,max_beam_width:1,engine_dir:/tensorrtllm_backend/model_repository/tensorrt_llm/1,max_tokens_in_paged_kv_cache:2560,max_attention_window_size:2560,kv_cache_free_gpu_mem_fraction:0.5,exclude_input_in_output:True,enable_kv_cache_reuse:False,batching_strategy:inflight_batching,max_queue_delay_microseconds:600
其中
- batch_scheduler_policy 设置为guaranteed_no_evict
- enable_trt_overlap 设置为False
- max_num_sequences 设置为batch-size一样
- normalize_log_probs设置为False
- gpt-model-type 设置为v1
再其中
修改postprocess和postprocess中的model.py 大约在81行左右,加上self.tokenizer.eos_token = "<|endoftext|>"
启动容器 trition-trt-llm
docker run --rm -it --gpus '"device=1"' --shm-size=2g --ulimit memlock=-1 --ulimit stack=67108864 -p 18000:8000 -v /home/triton-trtllm/:/tensorrtllm_backend trition-trt-llm:v3.0 bash
启动服务
pip install tiktoken
cd /tensorrtllm_backend/tensorrtllm_backend
# --world_size is the number of GPUs you want to use for serving
python3 scripts/launch_triton_server.py --world_size=1 --model_repo=/tensorrtllm_backend/model_repository
请求接口
curl --location 'http://localhost:18000/v2/models/ensemble/generate' \
--header 'Content-Type: application/json' \
--data '{
   "text_input": "What is machine learning?",
   "max_tokens": 64,
   "bad_words": "",
   "stop_words": ""
}'
性能
在A800上实际测试,吞吐约为vllm的一半,RT也没有明显的下降。可能A800跟A100还是有很大区别的
Triton24.02 部署TensorRT-LLM,实现http查询
选择正确的环境
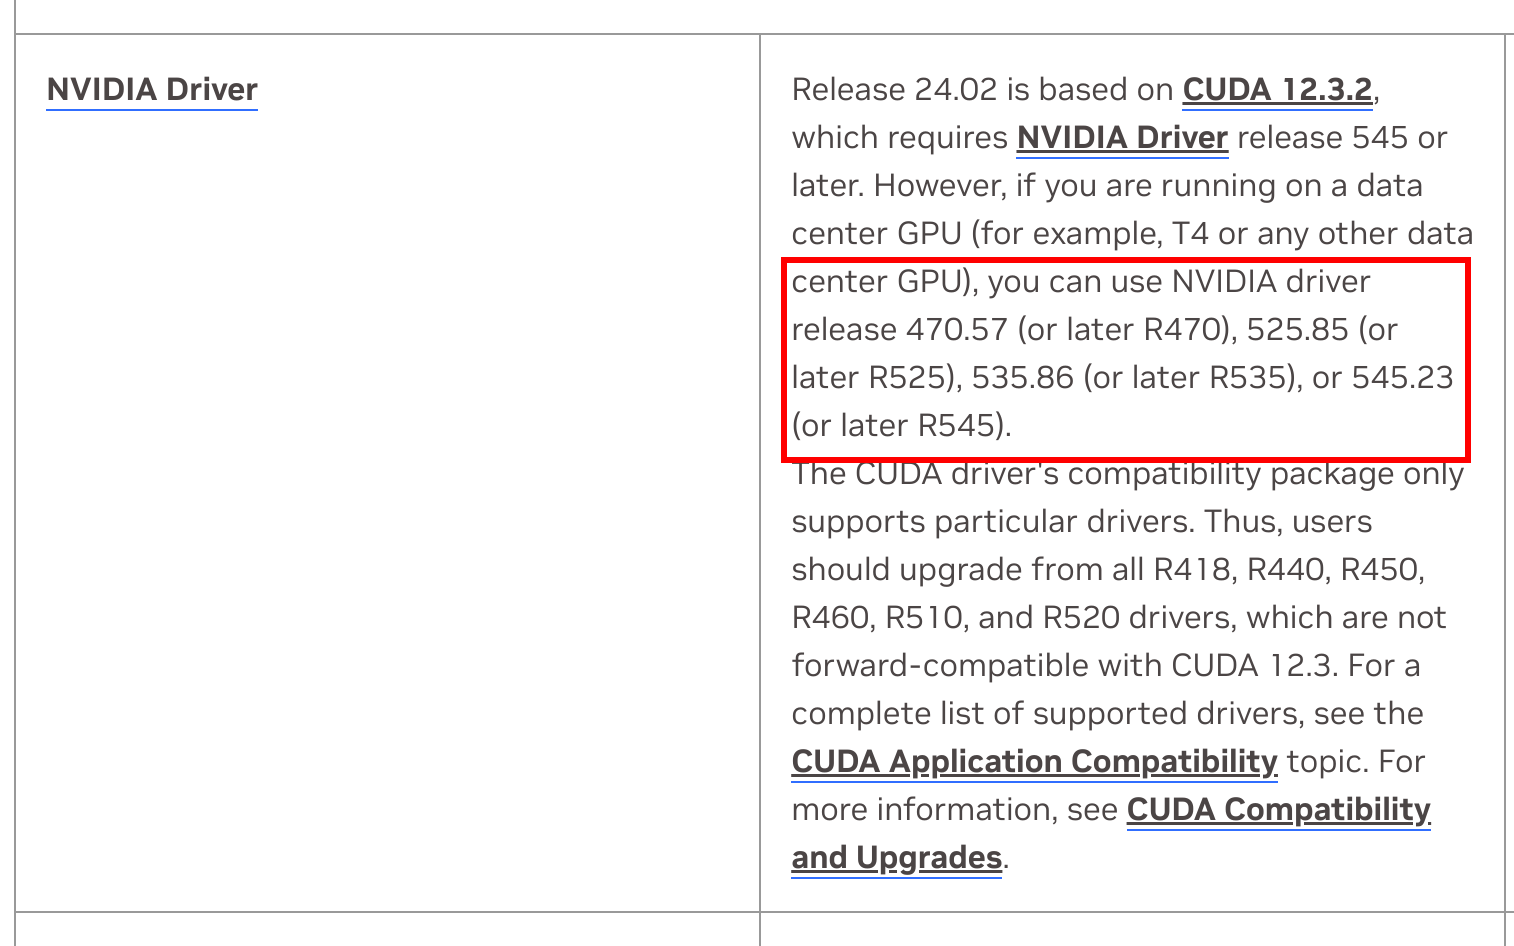
- 选择版本。查询nvidia官方文档,可以看到目前最新的容器是24.02。
- 在NVIDIA Driver这一行,它推荐的英伟达驱动版本是545以上,对于数据卡,可以适当降低。如果你是游戏卡,驱动版本没有545,也不想升级,那么建议至少不要低太多,比如535其实也可以。
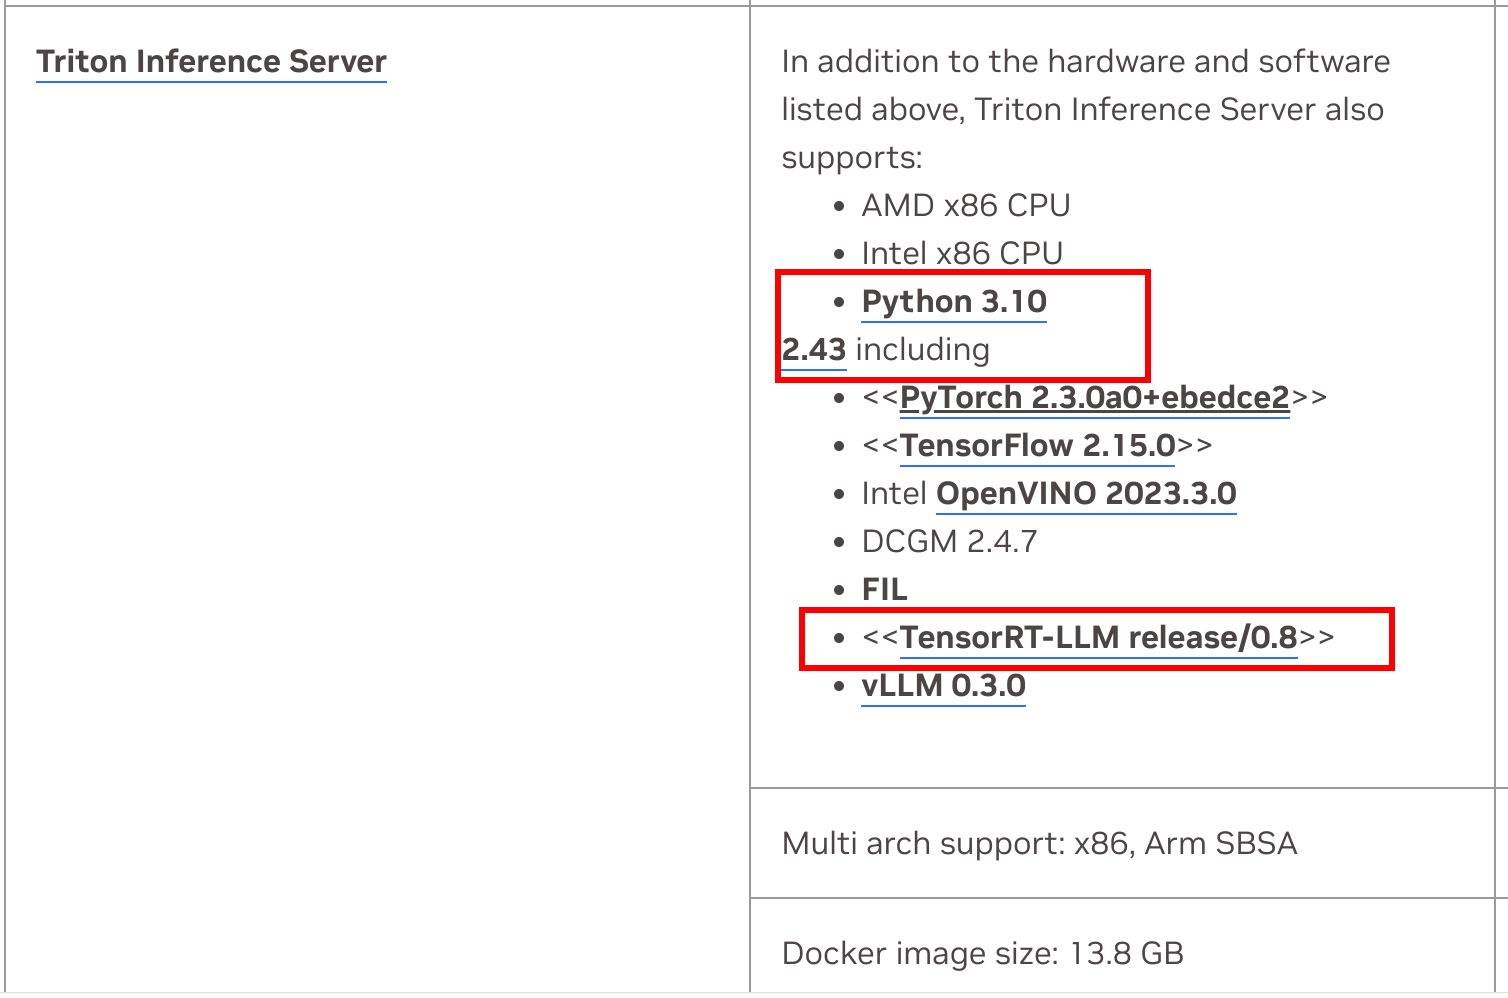
- 在Triton Inference Server这一行,可以看到它内置了triton server版本是2.43,需要的TensorRT-LLM版本是0.8.0。
- 拉取镜像。进入Nvidia镜像中心找到tritonserver的镜像,选择和TensorRT-LLM(简称trtllm)有关的容器,然后拷贝镜像地址,最后使用
docker pull来拉取该镜像。

docker pull nvcr.io/nvidia/tritonserver:24.02-trtllm-python-py3
- 拉取TensorRT-LLM的项目。
- 可以选择官方项目,但是注意要是v0.8.0
git clone https://github.com/NVIDIA/TensorRT-LLM.git -b v0.8.0
- 也可以选择我的项目,目前main分支就是0.8.0,后续可能会打成tag,建议实际访问项目地址,查看是否有0.8.0的tag。
git clone https://github.com/Tlntin/Qwen-TensorRT-LLM
- 下面演示是以我的项目为主,在triton_server上面部署Qwen-1.8B-Chat(毕竟这个模型比较小)
- 拉取tensorrtllm_backend。这个是用来编排tensorrt-llm服务的,需要和TensorRT-LLM版本一致,这里同样选择0.8.0
git clone https://github.com/triton-inference-server/tensorrtllm_backend.git -b v0.8.0
- 启动tritonserver容器
docker run -d \
    --name triton \
    --net host \
    --shm-size=2g \
    --ulimit memlock=-1 \
    --ulimit stack=67108864 \
    --gpus all \
    -v ${PWD}/tensorrtllm_backend:/tensorrtllm_backend \
    -v ${PWD}/Qwen-TensorRT-LLM/examples:/root/examples \
nvcr.io/nvidia/tritonserver:24.02-trtllm-python-py3 sleep 864000- 检查服务
- 进入容器
docker exec -it triton /bin/bash
- 检查英伟达驱动
nvidia-smi
- 检查tritonserver版本,至少和上面提到的一样,是2.43
cat /opt/tritonserver/TRITON_VERSION
- 检查tensorrtllm_backend版本,该数值必须和官方github仓库的0.8.0版本的tool/version.txt文件内容一致,官方仓库链接
cat /tensorrtllm_backend/tools/version.txt
- 直接通过pip安装TensorRT-LLM (如果是自己编译的容器,这步可以省略)
pip install tensorrt_llm==0.8.0 --extra-index-url https://pypi.nvidia.com --extra-index-url https://download.pytorch.org/whl/cu121
编译Engine
- 参考我项目的readme
- 进入容器
docker exec -it triton /bin/bash
- 重复之前的操作,安装qwen的依赖。
- 进入qwen2目录
cd /root/examples/qwen2
- 安装依赖
pip install -r requirements.txt
- 编译,需要在原来Readme编译的基础上开启paged_kv_cache,方便部署inflight-batching
- 例如fp16之前编译是
python3 build.py,现在改成下面这个。
python3 build.py --paged_kv_cache --remove_input_padding
- 例如int8-smooth-quant
之前编译命令是
# 转权重
python3 hf_qwen_convert.py --smoothquant=0.5
# 编译
python3 build.py --use_smooth_quant --per_token --per_channel
现在编译命令是
# 转权重
python3 hf_qwen_convert.py --smoothquant=0.5
# 编译
python3 build.py --use_smooth_quant --per_token --per_channel --paged_kv_cache --remove_input_padding
- 运行一下做个测试
python3 run.py
临时部署Triton
- (可选)直接复用本项目配置(batch_size=2,input=6144, output=2048),这样就跳过后续的第6,第7步骤,需要在容器外操作,懒人必备,不过还是推荐自己改好一些。
cp -r Qwen-TensorRT-LLM/triton_model_repo tensorrtllm_backend/
- 进入容器
docker exec -it triton /bin/bash
- 构建好目录
cd /tensorrtllm_backend
cp all_models/inflight_batcher_llm/ -r triton_model_repo
- 复制上一部分编译好的Engine文件
cd /root/examples/qwen2/trt_engines/fp16/1-gpu/
cp -r ./* /tensorrtllm_backend/triton_model_repo/tensorrt_llm/1/
- 复制tokenzer文件
cd /root/examples/qwen2
mkdir /tensorrtllm_backend/triton_model_repo/tensorrt_llm/qwen1.5_7b_chat
cp qwen1.5_7b_chat/*.json /tensorrtllm_backend/triton_model_repo/tensorrt_llm/qwen1.5_7b_chat/
# 可选,仅适用于qwen1,因为它的tokenizer是tiktoken格式
cp qwen_7b_chat/*.tiktoken /tensorrtllm_backend/triton_model_repo/tensorrt_llm/qwen1.5_7b_chat/
cp qwen_7b_chat/*.py /tensorrtllm_backend/triton_model_repo/tensorrt_llm/qwen1.5_7b_chat/
- (可选)编写Triton中的预处理配置和后处理配置, 参考文档
cd /tensorrtllm_backend
export HF_QWEN_MODEL="/tensorrtllm_backend/triton_model_repo/tensorrt_llm/qwen1.5_7b_chat"
export ENGINE_DIR="/tensorrtllm_backend/triton_model_repo/tensorrt_llm/1"
# 设置你的batch_size大小
export MAX_BATCH_SIZE=1
export TOKENIZE_TYPE=auto
# 根据cpu线程数定,一般为batch_size的2倍数或者cpu线程的一半
export INSTANCE_COUNT=2
# 我就一张卡,你可以指定用那些卡,用逗号隔开
export GPU_DEVICE_IDS=0


python3 tools/fill_template.py -i triton_model_repo/preprocessing/config.pbtxt tokenizer_dir:${HF_QWEN_MODEL},tokenizer_type:${TOKENIZE_TYPE},triton_max_batch_size:${MAX_BATCH_SIZE},preprocessing_instance_count:${INSTANCE_COUNT}

python3 tools/fill_template.py -i triton_model_repo/postprocessing/config.pbtxt tokenizer_dir:${HF_QWEN_MODEL},tokenizer_type:${TOKENIZE_TYPE},triton_max_batch_size:${MAX_BATCH_SIZE},postprocessing_instance_count:${INSTANCE_COUNT}

python3 tools/fill_template.py -i triton_model_repo/tensorrt_llm_bls/config.pbtxt triton_max_batch_size:${MAX_BATCH_SIZE},decoupled_mode:False,bls_instance_count:${INSTANCE_COUNT},accumulate_tokens:True

python3 tools/fill_template.py -i triton_model_repo/ensemble/config.pbtxt triton_max_batch_size:${MAX_BATCH_SIZE}

python3 tools/fill_template.py -i triton_model_repo/tensorrt_llm/config.pbtxt triton_max_batch_size:${MAX_BATCH_SIZE},decoupled_mode:True,max_beam_width:1,engine_dir:${ENGINE_DIR},exclude_input_in_output:True,enable_kv_cache_reuse:False,batching_strategy:inflight_batching,max_queue_delay_microseconds:600,gpu_device_ids:${GPU_DEVICE_IDS}- (可选)简单修改一下preprocess/postprocess的model.py的initialize函数,示例是llama的,我们要改成qwen的tokenizer配置。
- 修改前(preprocessing有三行,postprocessing只有一行):
self.tokenizer.pad_token = self.tokenizer.eos_token
self.tokenizer_end_id = self.tokenizer.encode(
    self.tokenizer.eos_token, add_special_tokens=False)[0]
self.tokenizer_pad_id = self.tokenizer.encode(
self.tokenizer.pad_token, add_special_tokens=False)[0]- 修改后
import os


gen_config_path = os.path.join(tokenizer_dir, 'generation_config.json')
with open(gen_config_path, 'r') as f:
	gen_config = json.load(f)
if isinstance (gen_config["eos_token_id"], list):
	pad_id = end_id = gen_config["eos_token_id"][0]
### if model type is base, run this branch
else:
	pad_id = gen_config["bos_token_id"]
	end_id = gen_config["eos_token_id"]
self.tokenizer_pad_id = pad_id
self.tokenizer_end_id = end_id
eos_token = self.tokenizer.decode(end_id)
self.tokenizer.eos_token = self.tokenizer.pad_token = eos_token
- 启动服务,单卡启动。
cd /tensorrtllm_backend
python3 scripts/launch_triton_server.py --world_size=1 --model_repo=/tensorrtllm_backend/triton_model_repo
- 另外开一个终端,测试一下http效果。
- 请求
curl -X POST localhost:8000/v2/models/ensemble/generate \
-d '{"text_input": "<|im_start|>system\nYou are a helpful assistant.<|im_end|>\n<|im_start|>user\n你好,你叫什么?<|im_end|>\n<|im_start|>assistant\n", "max_tokens": 100, "bad_words": "", "stop_words": "", "end_id": [151645], "pad_id": [151645]}'
- 输出结果
{"cum_log_probs":0.0,"model_name":"ensemble","model_version":"1","output_log_probs":[0.0,0.0,0.0,0.0,0.0,0.0,0.0,0.0,0.0,0.0,0.0,0.0,0.0,0.0,0.0,0.0,0.0,0.0],"sequence_end":false,"sequence_id":0,"sequence_start":false,"text_output":"你好,我是来自阿里云的大规模语言模型,我叫通义千问。"}%
调用服务
python客户端请求
- 安装python依赖(可选)
pip install tritonclient transformers gevent geventhttpclient tiktoken grpcio
- 运行
qwen/triton_client/inflight_batcher_llm_client.py文件即可开启
cd /root/examples/triton_client
python3 inflight_batcher_llm_client.py --tokenizer_dir=/tensorrtllm_backend/triton_model_repo/tensorrt_llm/qwen1.5_7b_chat
- 测试结果
====================
Human: 你好
Output: 你好!有什么我可以帮助你的吗?
Human: 你叫什么?
Output: 我是来自阿里云的大规模语言模型,我叫通义千问。
http流式调用
- 前提
- 编译的Engine开启了
paged_kv_cache - 部署triton时,
tensorrt_llm/config.pbtxt里面的gpt_model_type对应的value为inflight_batching
- 运行命令
curl -X POST localhost:8000/v2/models/ensemble/generate_stream \
-d '{"text_input": "<|im_start|>system\nYou are a helpful assistant.<|im_end|>\n<|im_start|>user\n你好,你叫什么?<|im_end|>\n<|im_start|>assistant\n", "max_tokens": 100, "bad_words": "", "stop_words": "", "end_id": [151645], "pad_id": [151645], "stream": true}'- 输出结果:
data: {"cum_log_probs":0.0,"model_name":"ensemble","model_version":"1","output_log_probs":0.0,"sequence_end":false,"sequence_id":0,"sequence_start":false,"text_output":"你好"}

data: {"cum_log_probs":0.0,"model_name":"ensemble","model_version":"1","output_log_probs":[0.0,0.0],"sequence_end":false,"sequence_id":0,"sequence_start":false,"text_output":","}

data: {"cum_log_probs":0.0,"model_name":"ensemble","model_version":"1","output_log_probs":[0.0,0.0,0.0],"sequence_end":false,"sequence_id":0,"sequence_start":false,"text_output":"我是"}

data: {"cum_log_probs":0.0,"model_name":"ensemble","model_version":"1","output_log_probs":[0.0,0.0,0.0,0.0],"sequence_end":false,"sequence_id":0,"sequence_start":false,"text_output":"来自"}

data: {"cum_log_probs":0.0,"model_name":"ensemble","model_version":"1","output_log_probs":[0.0,0.0,0.0,0.0,0.0],"sequence_end":false,"sequence_id":0,"sequence_start":false,"text_output":"阿里"}

data: {"cum_log_probs":0.0,"model_name":"ensemble","model_version":"1","output_log_probs":[0.0,0.0,0.0,0.0,0.0,0.0],"sequence_end":false,"sequence_id":0,"sequence_start":false,"text_output":"云"}

data: {"cum_log_probs":0.0,"model_name":"ensemble","model_version":"1","output_log_probs":[0.0,0.0,0.0,0.0,0.0,0.0,0.0],"sequence_end":false,"sequence_id":0,"sequence_start":false,"text_output":"的大"}

data: {"cum_log_probs":0.0,"model_name":"ensemble","model_version":"1","output_log_probs":[0.0,0.0,0.0,0.0,0.0,0.0,0.0,0.0],"sequence_end":false,"sequence_id":0,"sequence_start":false,"text_output":"规模"}

data: {"cum_log_probs":0.0,"model_name":"ensemble","model_version":"1","output_log_probs":[0.0,0.0,0.0,0.0,0.0,0.0,0.0,0.0,0.0],"sequence_end":false,"sequence_id":0,"sequence_start":false,"text_output":"语言"}

data: {"cum_log_probs":0.0,"model_name":"ensemble","model_version":"1","output_log_probs":[0.0,0.0,0.0,0.0,0.0,0.0,0.0,0.0,0.0,0.0],"sequence_end":false,"sequence_id":0,"sequence_start":false,"text_output":"模型"}

data: {"cum_log_probs":0.0,"model_name":"ensemble","model_version":"1","output_log_probs":[0.0,0.0,0.0,0.0,0.0,0.0,0.0,0.0,0.0,0.0,0.0],"sequence_end":false,"sequence_id":0,"sequence_start":false,"text_output":","}

data: {"cum_log_probs":0.0,"model_name":"ensemble","model_version":"1","output_log_probs":[0.0,0.0,0.0,0.0,0.0,0.0,0.0,0.0,0.0,0.0,0.0,0.0],"sequence_end":false,"sequence_id":0,"sequence_start":false,"text_output":"我"}

data: {"cum_log_probs":0.0,"model_name":"ensemble","model_version":"1","output_log_probs":[0.0,0.0,0.0,0.0,0.0,0.0,0.0,0.0,0.0,0.0,0.0,0.0,0.0],"sequence_end":false,"sequence_id":0,"sequence_start":false,"text_output":"叫"}

data: {"cum_log_probs":0.0,"model_name":"ensemble","model_version":"1","output_log_probs":[0.0,0.0,0.0,0.0,0.0,0.0,0.0,0.0,0.0,0.0,0.0,0.0,0.0,0.0],"sequence_end":false,"sequence_id":0,"sequence_start":false,"text_output":"通"}

data: {"cum_log_probs":0.0,"model_name":"ensemble","model_version":"1","output_log_probs":[0.0,0.0,0.0,0.0,0.0,0.0,0.0,0.0,0.0,0.0,0.0,0.0,0.0,0.0,0.0],"sequence_end":false,"sequence_id":0,"sequence_start":false,"text_output":"义"}

data: {"cum_log_probs":0.0,"model_name":"ensemble","model_version":"1","output_log_probs":[0.0,0.0,0.0,0.0,0.0,0.0,0.0,0.0,0.0,0.0,0.0,0.0,0.0,0.0,0.0,0.0],"sequence_end":false,"sequence_id":0,"sequence_start":false,"text_output":"千"}

data: {"cum_log_probs":0.0,"model_name":"ensemble","model_version":"1","output_log_probs":[0.0,0.0,0.0,0.0,0.0,0.0,0.0,0.0,0.0,0.0,0.0,0.0,0.0,0.0,0.0,0.0,0.0],"sequence_end":false,"sequence_id":0,"sequence_start":false,"text_output":"问"}

data: {"cum_log_probs":0.0,"model_name":"ensemble","model_version":"1","output_log_probs":[0.0,0.0,0.0,0.0,0.0,0.0,0.0,0.0,0.0,0.0,0.0,0.0,0.0,0.0,0.0,0.0,0.0,0.0],"sequence_end":false,"sequence_id":0,"sequence_start":false,"text_output":"。"}

data: {"cum_log_probs":0.0,"model_name":"ensemble","model_version":"1","output_log_probs":[0.0,0.0,0.0,0.0,0.0,0.0,0.0,0.0,0.0,0.0,0.0,0.0,0.0,0.0,0.0,0.0,0.0,0.0],"sequence_end":false,"sequence_id":0,"sequence_start":false,"text_output":""}
关闭triton服务
pkill tritonserver
永久部署
- 在上个容器部署时,我们启动的命令是
python3 scripts/launch_triton_server.py --world_size=1 --model_repo=/tensorrtllm_backend/triton_model_repo,经过修改tensorrtllm_backend/scripts/launch_triton_server.py文件,倒数第二行增加一个print("cmd", cmd)在结尾打印出它真实运行的命令如下:
["mpirun", "--allow-run-as-root", "-n", "1", "/opt/tritonserver/bin/tritonserver", "--model-repository=/tensorrtllm_backend/triton_model_repo", "--grpc-port=8001", "--http-port=8000", "--metrics-port=8002", "--disable-auto-complete-config", "--backend-config=python,shm-region-prefix-name=prefix0_", ":"]
- 编写一个Dockerfile来启动刚刚的命令,替换原来容器自带的命令。
FROM nvcr.io/nvidia/tritonserver:24.02-trtllm-python-py3
USER root
# Option
# COPY tensorrtllm_backend /tensorrtllm_backend
WORKDIR /tensorrtllm_backend

CMD ["mpirun", "--allow-run-as-root", "-n", "1", "/opt/tritonserver/bin/tritonserver", "--model-repository=/tensorrtllm_backend/triton_model_repo", "--grpc-port=8001", "--http-port=8000", "--metrics-port=8002", "--disable-auto-complete-config", "--backend-config=python,shm-region-prefix-name=prefix0_", ":"]
- 编译新镜像,命名为tritonserver:24.02
docker build . -t tritonserver:24.02
- 测试一下是否ok
docker run -it \
    --name triton_server \
    --net host \
    --shm-size=2g \
    --ulimit memlock=-1 \
    --ulimit stack=67108864 \
    -v ${PWD}/tensorrtllm_backend:/tensorrtllm_backend \
    --gpus all \
tritonserver:24.02- 测试一下请求,没问题就退出,然后删除该容器
docker rm -f triton_server
- 永久开启该容器,设置后台启动,并且设置自动重启
docker run -d \
    --name triton_server \
    --net host \
    --shm-size=2g \
    --restart always \
    --ulimit memlock=-1 \
    --ulimit stack=67108864 \
    -v ${PWD}/tensorrtllm_backend:/tensorrtllm_backend \
    --gpus all \
tritonserver:24.02- 查看一下这个容器运行情况,发现正常。
docker logs triton_server
Qwen-TensorRT-LLM
- 登录 发表评论